
How To Recover Data From Your Hard Drive Yourself
Step by Step DIY Data Recovery Instructions
Step 1: Start by removing the hard drive from your desktop or laptop computer.
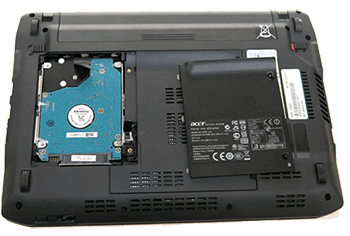
Laptop Computer Hard Drive Removal: Most laptop computers have a cover plate on the bottom that you need to remove to gain access to the hard drive. Some are more difficult and require removal of the keyboard to gain access to it. If your unsure of how to remove your hard drive from your laptop, search Google for hard drive removal instruction from your specific laptop model.
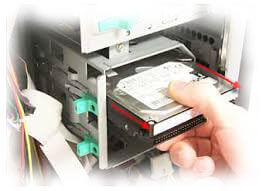
Desktop Computer Hard Drive Removal: Start by removing the side panel of your desktop tower so you can gain access to the hard drive. Once the side panel is removed, you will find your hard drive inside. Every computer is different so if you are unsure how to remove the hard drive, search Google for hard drive removal instructions from your specific desktop computer model.
Step 2: Connect your hard drive to a working computer.
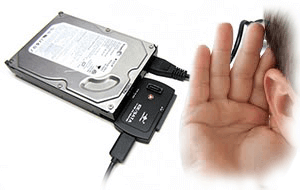
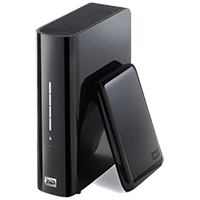
(The easiest way to connect your drive to another computer is with a USB adapter.)

This is a great way to attempt recovery of your data yourself. Universal USB adapters like the one pictured to the left allow connection of IDE and SATA laptop and desktop hard drives. The adapter has an on/off switch that allows you to quickly power off your drive if you find your drive is making unusual noises caused by a mechanical failure.
Step 3: Power on your drive to see if its recognized by your computer and put your ear next to it to listen for unusual sounds.
Listen for any unusual noises such as clicking, beeping, grinding, scratching, whirring, buzzing or any other unusual sounds coming from your hard drive before you move to the next step.
Step 4: check to see if your drive is recognized and if you can access your files.
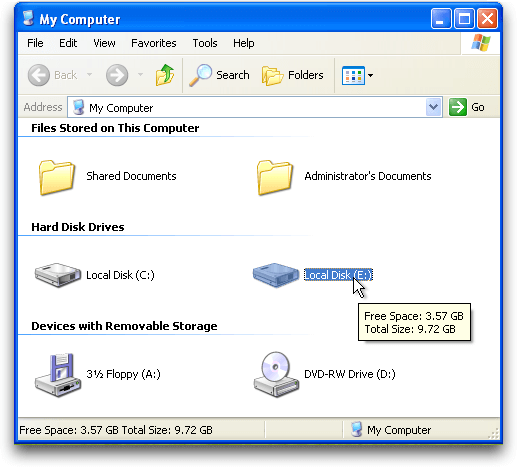
If your drive is recognized, click on it to see if it will open and allow you to access your files. If it does, you need to transfer your data to your computers hard drive or to an external hard drive. Make sure the media device you are transferring your data to has enough free space to fit all of your files.
If your drive is recognized but you have no access to your data or your computer crashes or freezes when you attempt to open your files, your drive is very likely mechanically failing and you need to shut it off immediatly to prvent further damage or complete data loss. This type of failure is usually caused by failed or failing read / write heads and/or damaged sectors caused by the heads of your hard drive crashing on the platters during drive operation. This is a serious problem and continued attempts to access your data or power on your hard drive will cause additional stress and likely lead to more head crashes. This will likely make some or all of your data completely unrecoverable very quickly.
This is where you need to ask yourself a serious question: How does it affect me, my business and the people around me if I lose the files on this hard drive forever?
The answer to that question should determine how you proceed from here.
You have two logical choices: You can try data recovery software or you can contact us to help you successfully recover your files and greatly increase the chances of a successful recovery.
Option 1: Data recovery software is not designed to recover data from physically failed or physical failing hard drives. Data recovery software is designed to recover data from logically failed drives or situations where you accidentally deleted data or formated your media device. Every data recovery software company explicitly states this fact and warns you not use their software to attempt recovery of a physical failed or failing hard drive.
Option 2: You can send your drive directly to our lab where our world leading data recovery engineers will work to recover your important files. Here we use the most advanced hardware based data recovery equipment, techniques and technology in our class 100 clean room environment to ensure the best possible chance of a successful recovery of your data. If you believe your drive is physically failed or failing, we recommend using our in lab data recovery service. Call 1-866-221-3111 or Submit a Case Online and get an instant quote for our in-lab data recovery service right now.
If you believe your hard drive is logically failed, you deleted or formated your drive accidentally or simply want to continue the recovery attempt yourself with software regardless of the risk, continue to the next step.
Step 5: Connect an external hard drive to your computer that you can save your recovered data to or make sure you have enough free space on the computer you are using to recover your files.
Make sure the destination drive that you plan to save your recovered data to has enough free space to save your recovered files to. If the computer you are using has enough free space you can save the data to its hard drive but never attempt to save the recovered data back to the source drive.
Source drive: The drive your recovering data from.
Destination drive: The drive your recovering the data to.
Step 6: Format the external drive to your desired format.
NFTS = Windows: NTFS is the format you should use if your data was created with a windows machine and will continue to be used by a windows machine. A Mac can read the data from an NTFS drive but you can't write to an NTFS drive with a Mac.
HFS = Apple/Mac: HFS is the format you should use if your data was was created by a Apple/Mac machine and you intend on using it primarily with an Apple/Mac.
Fat 32: Fat 32 can be used by Windows and Apple/Mac but Fat 32 format has limitations. For instance you can not create a file larger than 4GB so if you plan on putting non compressed full length movies on your drive, you should probably not use Fat 32. Fat 32 also operates much slower than NTFS or HFS so if speed is important to you, you should not use Fat 32.
ExFat: ExFat is a relatively new file system that is supported by Windows and Mac. You may need to download an update for your operating system to use ExFat but its a good option for those who intend to use their drive with both Mac and Windows computers. ExFat does not have size limitations and is plenty fast.
Other options: If you primarily use your data with a Mac but want the ability to use it with Windows and you don't want to mess with ExFat then you have another cool option. You can format your drive HFS so it works with your Mac and you can purchase a copy of MacDrive for your Windows machine. MacDrive will let you read your HFS formatted drive on your Windows machine. Here is a link to MacDrive if you are interested. Its a cool little program.
Step 7: Download the data recovery software Free and verify that your data is recoverable before you pay a thing.
Click the appropriate software box below.
Windows Data Recovery

Mac Data Recovery
Step 8: Select the drive that you want to attempt recovery on and scan it making sure you save the scan. Open the scan results and test the files to make sure your files are recoverable. Finally, save the recovered data to the selected target drive.
If the scan is estimated for substantially longer than 4-6 hours for a 1TB drive there is likely a physical problem with the drive and you need professional recovery. Scanning a failing drive or a drive with bad sectors adds additional stress to the drive that can destroy any chance of a successful recovery. If you are experiencing these symptoms, we recommend our in-lab professional recovery to make sure your data is successfully recovered.
Warning: Do not install the software or recover the data back to the drive you are attempting to recover. If you install the software or save the recovered data to the drive you are attempting to recover you will very likely make your data unrecoverable.